Final Project
aka Bunny World
Support
Design Check 1: Thursday, October 29th, in class
Revised Design: Thursday, November 5th, in class
Check Point: Thursday, November 19th, in class
Due: Thursday, December 3rd, 11:59pm
Silly Premise
You're in the forrest. The leaves are thick and confining, the sweat is
pouring down your face and you think there are snakes slithering past your
ankles. The buzz of the insects rings loud in your ears...
There's a door here.
There's a bunny here.
> pet bunny
You don't know how to "pet"
> take
What do you want to take?
> bunny
That sounds silly
> open door
You push all your weight against the massive oak door, but it doesn't seem
to budge even an inch.
You're starting to sweat more.
> look at door
The door is huge, made essentially of a single slab of oak. The tree this
came from must have been impressive. There is a single handle on the
front, and a complicated keyhole underneath. The keyhole, actually, looks
somewhat strange.
> look at keyhole.
It appears to be in the shape of a bunny.
You're starting to sweat more.
> take bunny
You don't really want to take the bunny, do you?
> yes
Pardon?
> look
You are starled to find that the image in front of you is now a mirror.
Staring back from the reflection is a severely frustrated TA, who just
can't seem to make their bunny world work. The TA stares imploringly at
you, asking an unvoiced question.
You're starting to sweat more.
New Concepts
-
File I/O
-
Loading Images
-
Text Commands
-
Teamwork!
Assignment Specifications
Your assignment is to implement a generic driver for a simple graphical
adventure/puzzle game. This driver should use some sort of data files
to create the world in which the action of the game takes place. At a
basic level, your final project operates like a low-budget version of
Myst.
This handout will refer to two seperate parts of the Final Project, the
Game and the Driver. The Game is what will appear on the screen during
run-time. It will be a graphical world populated with pictures, with
some sort of object or theme. The user can move about this world,
solving puzzles and taking objects by typing in commands. The Driver is
the actual program that you will be writing. It creates a playable Game
using data files that you have written which describe the elements of
the Game. It should be generic enough to be able to create any game
using data in the format that you create. You should not hard-code any
part of your specific game, but your data should specify what that game
should be, and your Driver should interpret that and create the game.
In this way, what you are actually doing is writing an interpreter for a
scripting language that you design. The language is the data, the
interpreter is the Driver. The only purpose of the Game is to show us
that your Driver works (and to have a little fun in the process).
The basic elements of the Game are:
1) Pages
A page is a rectangular area which can contain a number of
"shape" objects. The "world" contains many pages,
however only one page and its contents are visible at a time. Certain
actions within the game will switch the game to show a different page
and its contents. Pages should be generated from a file or files that
you create. Keep in mind that if the game is saved, these files should
reflect any changes that were made to the state of the pages. You
should have a special "start" page where the game starts when
it is first run. You will likewise want to have an "end"
page, which will be displayed when the user finishes/solves the game.
Like every element in the game, each page should have a unique name.
You may find it useful to give your pages numbers as well.
A word on pagefiles: Your files should also make some provisions for
commenting. This makes it much easier to read these files, since they
contain some description, and not just a stream of seemingly random
numbers. Since you are going to have to write and your TA is going to
have to read these files, the more sense they make on their own, the
better. Also, remember that should the user want to save the game, you
are going to want some way to remember what your original pagefile(s)
looked like.
2)Shapes
Shape is the generic name for all the inhabitants of your graphical world. They may display text, Images, respond to commands, serve you coffee, or anything else you can think of.
Each shape has several attributes:
- Each shape has a name
- Each shape should belong to a particular page or the possessions area.
- Each shape may be "hidden", in which case it does not draw and is not clickable during play. This is because you may want shapes to appear and disappear at certain times.
Some of your shapes will have the following additional attributes:
- React to mouse clicks
- Move in and out of the possessions area when clicked or when the TAKE or DROP commands are issued.
- Change states when a certain action has been performed. (ie, visible to hidden, open to closed, or toggle between different images)
Other than that, the implementation of shapes is entirely up to you.
3)Possessions Area
Below the page there is a visually separate "possessions" area where the user may drag movable shapes. The possessions area operates like a permanent little page where shapes may go. During the play of the game, the possessions area provides a way for the user to move shapes from page to page. Should a user want to save the game, the shapes in the possessions area should be stored and recalled when the game is restarted.
4)Command Line
The command line should be an area where users can type in simple commands to the game. It may be case-sensitive, but that is not necessary. Commands that must be implemented are:
-
LOOK --Displays a text description of the page in the text area which includes a list of the possible exits and a list of the "visible" shapes.
-
TAKE <shape> --Adds the shape with that name to the possessions area and removes it from the current page
-
DROP <shape> --Moves the shape with that name from the possessions area to the current page
-
NORTH, SOUTH, EAST, WEST --Displays the page that is accessed by moving in
that direction from the current page
Other commands are encouraged and will be considered extra credit if
sufficiently complex. Commands that cannot be carried out should
display an appropriate message. For example if the user types
"TAKE BUNNY" and there is no bunny on the page, an error
message such as "I can't find the BUNNY" should be displayed
in the text area. Keep in mind that you should also have a seperate
error message for commands that your game does not understand, like
"HOP" or "EAT".
5)Text window
The text window is just a place to display various messages to the user.
These messages could include page descriptions, error messages, or a
list of the possible directions to get to the next page.
Example: Bunny World
Below is an example screen shot from a Final Project called Bunny World.
The componants are from top to bottom: the Page (with the shape of a
large Bunny); the Text Area (with a description of the page); the
Command Line (with the command DROP CARROT); and the Possessions Area
(with a shape of a carrot).
You do not need to recreate this particular GUI exactly. This is only
to give you an idea of what we are expecting. Play the Demo
(/course/cs005/demos/RunBunnyWorld) for more and better examples.
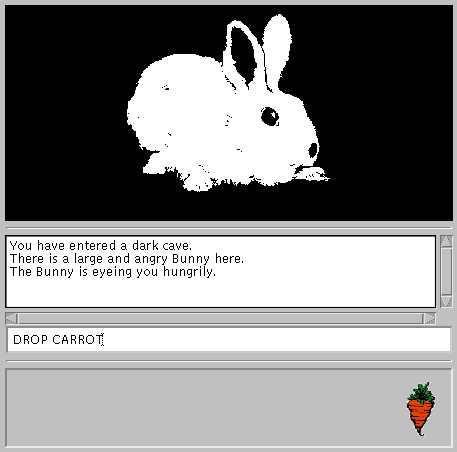 Screen Shot of the Sample Project: Bunny World
The Rules
We are giving you a great deal of freedom in designing your own game. However, freedom never comes without a price. Therefore we are giving you some rules to insure that no one hands in a project like: "Darkness: 12 pages of the color black". Hopefully you will excited enough about this project that you won't have to worry about the rules, but, just in case, here they are.
Your world must contain at least 8 different pages
There must be a way to "get to" every page
There must be a fixed starting page and a fixed ending page
Your game must contain shapes that cannot be taken.
There must be a way to reveal every hidden shape
Descriptions of pages must take into account the shapes on that page
Shapes must be independent of pages (can be moved to another page, with no difficulty)
Information for building pages and shapes must be stored in files
There must be a way to save the game
You must have some kind of story/theme. Please create your own
silly premise to go with the story or theme of the game. Be Creative!
These rules are certainly not set in stone. However, if you choose to
break/bend/ignore one or more of these rules please see the TA first. The
rules are just there to make sure your program is sufficiently complex
for a two-person seven-week final project, they are not meant to restrict
your creativity. Above all, your game should contain examples of all
the features that you have included in your driver. Also, the one rule
that we cannot ignore is that your theme must be independent of your
driver. That is, your driver should be able to create, within reason,
any other story. Put more concretely, the same driver that created
BunnyWorld, should be able to create DuckWorld, or The Amazing
Adventures of Magic Johnny.
Plan of Attack
First, find a partner that you think you would work well with. Groups
of three will not be permitted unless absolutely necessary and if so,
projects submitted by such groups better be really special. With that
partner, design the game in general terms. That means your design
should be independent of whatever theme or story you end up with. This
is so you don't waste time thinking up a creative scenario and get
behind, and in case you decide to change your story halfway through.
Come up with lots of interfaces. After you design the project, split it
into two parts. You can split it any way that seems logical to you. One
way is to have one person work on the Shape code, the GUI, and command
parsing while the other works on file reading and writing and data
manipulation. Meet with each other frequently for "progress
reports". Once you have your general Driver code, which you have
tested, then you can start to make your game. If you wish to add images
to your game and run out of room in your home directories, you can put
them in /course/cs005/images/. Just make a subdirectory for your group.
Do not abuse this directory. After you have decided on a theme and have
a storyboard, then both of you can start to put the game together.
Handin Stuff
Every team needs a team name, preferably something relevant to your
game's story. This name should be in the header comment of each java file,
along with the author of that file. If both members worked on a
particular class, then put both names at the top.
Your should include a README file which you may hand in
electronically. This should contain the team name, who's in the group,
and their accounts:
Mystic Bunnies - Andrea Tartaro: adt; Seth Proctor: stp
More importantly, your README should contain a thorough description of
your game, as well as anything else we should know such as if you
decided to add extra features to your game, or if there is anything that
doesn't work properly. You should explain how to use your program, what
commands you support, and a short descripion of how to get from the
Start page to the End page. Maps are encouraged. The README should
also explain how the work was divided up. Also include the silly
premise in your README.
Deadlines
For this assignment, you have two design checks and a check point,
to help you stay on track with the assignment. The first design
check will be interactive with the TA. During class, each group
will meet with the TA to discuss their design. This way, you can
get immediate feedback and think about revisions to your design. A
paper handin will also be required at this check point. You will
receive further comments on the paper handin. Be sure to keep a
copy for yourself to work on your revisions. For the first design
check you should have:
A class diagram and description of your classes and
methods. We encourage you to use one of the design tools
available (Rational Rose or OMT).
A design of your file format
A description of how you are going to divide up the project
An interface for how the parts of your program are going to
communicate
A description of what you plan to have done by the check point
(explained in more detail below)
The second design handin is to give you the opportunity to revise
your design. This is a paper handin due at the beginning of class.
The check point for the final project is a little different than for
Tetris. For the design check, you will outline what you think is
reasonable to get done by the check point (about half of the
program). For the check point, you will be evaluated based on what
you laid out to get done in your design. This self-designed check
point is to let you decide what is the best way to divide up the
project.
Help!
Stuff We Give You
All of the classes we give you have online documentation which is
available from the web page. They are also world-readable and you can
find them in the /course/cs005/src/java/ directory.
cs005.gui.ReturnTextField: a single line of editable
text that calls its returnPressed(String txt) method whenever the return
key is pressed. You should fill in the returnPressed method in a
subclass. This is a subclass of java.awt.TextField
cs005.io.FileLineReader: a class that allows you to read from
files fairly easily. You should supply a path to the file you want to
read from to the constructor of this class. Then use the accessor
methods to get the information from the file.
Other Stuff You Should Use
java.awt.TextArea
Provides an area to display a large amount of text. Can be
read-only or editable
java.awt.event.MouseAdapter
An implementation of java.awt.event.MouseListener, with methods that
get called when MouseEvents occur
java.util.StringTokenizer
A utility that takes strings, and seperates them into substrings, based on some supplied heuristic
java.util.Vector
You've seen these before
Files
Here's an example of a page file. Again, this is just an example, and may not, in fact, be the best one.
#PageNumber

3

#PageName

Mr. Bun's Lair

#Shapes

GiantBunny

Door 5 n hide

#Text

You have entered the Lair of Mr.Bun!

There is an exit to the South

#Exits

#North

5

#South

2

#East

-1

#West

-1
In this example, text proceeded by a "#" is a comment used to
separate fields. You will also notice that there is some other text
after the "Door" field. This could be used as parameters to
construct a Door object. In this case, the door would be to Page 5, to
the north and hidden. Also, notice the -1 in the east and west fields.
In this example, those are used to indicate that there are no exits to
the east or west. You do not have to use this format, use the one that
makes the most sense to you. All of the information on your pages
should be generated from these files. In this way, adding pages to your
game requires only adding another file. For another example, see the
files used in the demo. They are all located in the directory
/course/cs005/asgn/FinalProject/pages/
So, how about that Design, anyway?
The object of this assignment is to write a driver that turns files of a
certain format into games. It useful to seperate this into two distinct
problems. Turning files into some sort of useful information, and
turning that information into a game. Remember, since you are working
on this as a two-person project, you want both parts to be as separate
as possible. On the information side, it might be helpful to have some
sort of classes that only hold data. Their function would be to keep
track of what shapes, text, and commands each page has. You would need
to make sure that you could set this data (when reading from a file) and
get the data (when you want to display a page). Remember, though, that
you only have one page being displayed at a time. So, there needs to be
some way to access the data for the page you are currently on only. For
this reason, you need to have some class that the rest of the program
can use as an interface to the data, sort of a data manager. This data
manager should implement a java Interface that you and your partner have
agreed upon, so you both know which methods are going to be necessary
for your program to work. Remember that the contents of the data may
need to change throughout the course of the game. On the game side, it
would be useful to have a class that knows about the interface and uses
it to display what is on the screen for each page. To do this, it would
just have to ask the data, through the interface class, for the shapes,
text, etc. that need to be displayed. Here's a simple picture of how
all this would work.

The arrows here represent a "contains" or "knows about" relationship. It should not be necessary for any of these classes to know about the class that contains them. Yay encapsulation!
A way to make your program more extensible would to be to have some sort of Command class. This will enable you to create commands from files, and add commands to shapes. The Command class need not be very complicated. In fact the only method it needs is the one that does whatever the command is supposed to do. Think about the best way to implement commands for the design check.
Parsing Is Fun!
It sure is! You lucky students get to do two different kinds of parsing in this assignment.
String Parsing
The java.util package contains a handy little object called the StringTokenizer. What this will do, is break up strings based on some sort of pattern. When you create a StringTokenizer, you pass in a String to "tokenize" and another which represents the characters that separate each substring, or token. A call to the nextToken() method will return a token. For example, let's say we supplied the phrase "Chocolate is no good for bunnies" and the separating character " " to the tokenizer's constructor. A call to nextToken() will first return the String "Chocolate", then "is", and so on. The method hasMoreTokens() returns true if there are more tokens left in the string. Consult the documentation for more information on this class.
File Parsing
File parsing in this assignment involves taking a text file and breaking it into Strings. Once we get that far, we will have reduced this to a previously solved problem (see above). To read a file, you should use IO.FileLineReader from your very own CS5 IO package. Supply a path to the file you want to read to the FileLineReader's constructor, and viola! All you have to do is call either read() or readLine() and you pretty much have a string! See the documentation to find out how to do this in more detail.